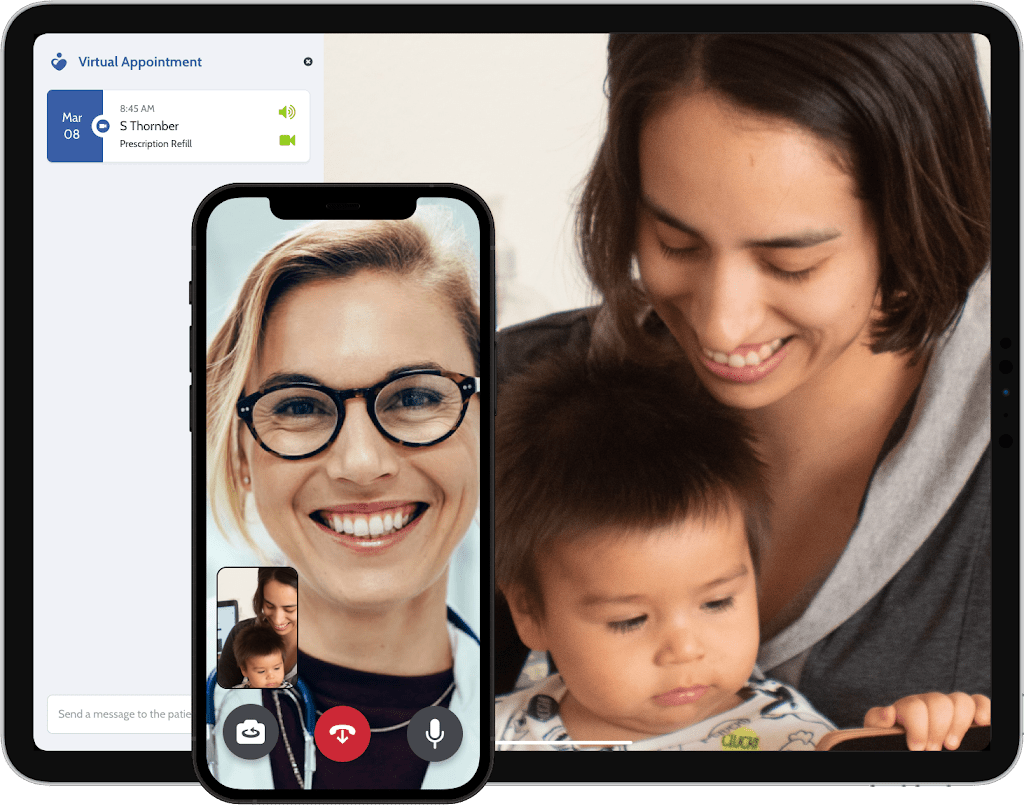
When a doctor starts a Telehealth call with a patient, both on iOS and Android, the patient’s phone will ring. For MyHealthAccess, whether the user is in the waiting room in the app or not, the phone will ring connecting the patient with the doctor more seamlessly.
Appointment confirmations are now also available more easily, please read more about this below.
Telehealth appointments are on the rise, so we recently added new functionality that rings your patients’ iOS and Android phones. This means they do not have to have the application open to receive the call.
The typical flow of a Telehealth appointment is as follows:
1. The patient, we will call her Mary, uses the MyHealthAccess application or website to book a telehealth appointment with your clinic. She automatically receives a message to confirm that the booking has been completed.
2. The appointment is added to the appropriate provider’s schedule in your Juno EMR. It can easily be identified by staff members and physicians as a Telehealth appointment as it has a camera icon on the left of the appointment entry, beside the appointment status icon.
3. Mary receives an email with the Telehealth appointment details 30 minutes before the appointment. This acts as a reminder. She does not need to open MyHealthAccess on her mobile device at this point.
4. When the doctor is ready to see Mary, he/she can start the telehealth appointment by clicking on the camera icon. This will launch the Telehealth session. The doctor will then be able to call Mary by clicking on the Call Patient button.
5. Mary’s cell phone rings and vibrates as the Telehealth call arrives, just like a regular call. Mary answers.
6. The Telehealth appointment starts.
7. Upon completion of the Telehealth appointment, the call ends, and the doctor documents his encounter in Mary’s chart.
You will also be pleased to know that an appointment confirmation feature is now available which allows your patients to confirm their appointment times. Patient-confirmed appointments are identifiable by looking at the icon on the right of the appointment in the Juno schedule.
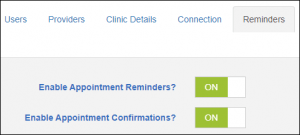
The confirmation feature is part of the reminders module and can be configured by going through the following steps:
1. Begin by accessing the MyHealthAccess admin portal for your clinic. This is done by clicking on the “MyHealthAccess” link at the top of your schedule page.
2. Once in MyHealthAccess, click on the “Settings” tab towards the top right of the page, then select the “Reminders” tab.
3. Ensure the appointment confirmations feature for your clinic is enabled. The toggle next to “Enable Appointment Confirmations?” should display “ON”.
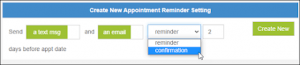
4. Create a new appointment reminders schedule rule to determine when the confirmation request will be sent to your patients:
- Select what type of message will be sent out: a text message, email, or both.
- Change the drop-down selection from “reminder” to “confirmation”.
- Enter how many days before the appointment you would like the confirmation-reminder to be sent.
- Click on the “Create New” button.
5. Configure the appointment confirmation templates. These can be found by scrolling down on the page. You can determine the email subject and body for email confirmations, and the text for text messages. You can find the list of available text placeholders by clicking on the “Show Instructions” link just above the “Email Subject” field. These tags will be replaced by the patient, provider or appointment information when the reminder is sent.
6. Select “Save Template Settings” to complete the setup.